
Now say that ten times in a row, fast, I dare you. Anyhow, we've gathered today to enjoy another ultra-geeky tutorial on how documents ought to be written, styled, formatted, prepared, presented, and in short, written. You may be tempted to use an office suite of some kind and scribble your work in a word processor, but I beg you, don't. There's a whole world of superior alternatives waiting for you, if you're only willing to take the leap of faith and hurl into the chasm of nerdiness.
However, office suite fans will tell you that LaTeX is too difficult and that it's only good for scientific documents. Aha! Well, that's kind of true. There are many things you may want in LaTeX, but they are not instantly apparent. In this article, I'd like to show you the common obstacles a recent Word user may face and how to get around them, quickly and painlessly.

Grab your LaTeX
LaTeX is the one true way of writing documents. You may use LaTeX from the command line or you may use a frontend. The second option is recommended for most people. Popular options include LyX and Kile, for example. LyX is cross-platform and will run on both Windows and Linux. In this article, I'm going to use LyX as a text processor, pretty much like you would use any office suite program.
Note: All examples based on MY taste, so make sure you understand the principle before using any of the tricks listed here. All right, let's dive in, in earnest.
Basics
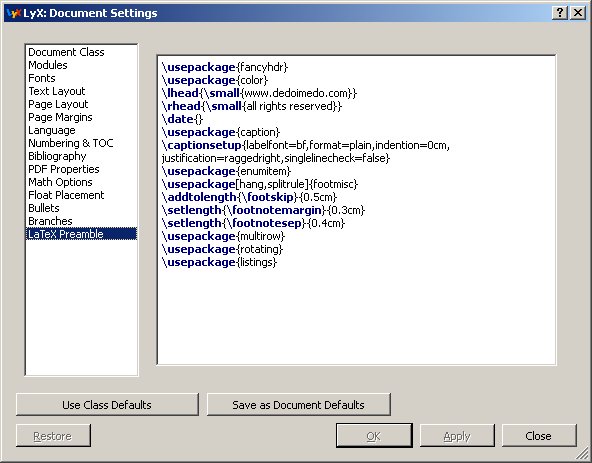
Inserting LaTeX code in LyX documents can be done with Ctrl + L. Permanent changes that affect the entire document can be inserted in the document preamble, a sort of a template section where you declare your major stuff, like header, footer, bookmarks, colors, etc.


Now, let's examine some popular tricks - or annoyances if you will. I'm trying to tackle the issues that a normal person would bravely encounter when trying to use LaTeX the way they expect the documents to behave.
In no particular order:
Trick 1: Align bullets or numbers to left page margin
By default, the items are indented by one tab space. This could annoy you. No worries, the solution is extremely simple. Before any first itemize or enumerate list in your document, you will need to add a small snippet of code. Alternatively, use the Preamble.
For bullets:
\setitemize[0]{leftmargin=XXpt,itemindent=XXpt,labelwidth=XXpt}
For numbers:
\setenumerate[0]{leftmargin=XXpt,itemindent=XXpt,labelwidth=XXpt}
The exact margins will depend on your needs and style, as well as fonts. But you get the idea. Play with different values to see the final effect. In my case, as shown in the image below, the settings are as follows:
\setitemize[0]{leftmargin=15pt,itemindent=0pt,labelwidth=10pt}

You will also need to use the enumitem package; declare in the Preamble:
\usepackage{enumitem}
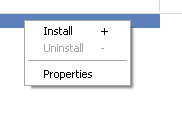
If this package is not installed, you will need to install it first. You can let your LaTeX software handle the installation or manually download the missing packages and extract them into the right path. Personally, I'd say don't bother. Let the software do all the hard work. For instance, on Windows, MiKTeX will do that for you:
Trick 2: Nice-looking footnotes
If you want your footnotes to be aligned nicely, here's the code what does it. The example below includes values that I think work best. Use your artistic judgment and adjust accordingly.
\usepackage[hang,splitrule]{footmisc}
\addtolength{\footskip}{0.5cm}
\setlength{\footnotemargin}{0.3cm}
\setlength{\footnotesep}{0.4cm}
\addtolength{\footskip}{0.5cm}
\setlength{\footnotemargin}{0.3cm}
\setlength{\footnotesep}{0.4cm}

Trick 3: Split long titles
You may have section and subsection titles that stretch endlessly, making your Table of Contents look somewhat garbled. The solution as simple as inserting a new line symbol into the title line at the desired point, thusly:

And the end result:

Trick 4: Image width
If you need to insert multiple images into your code, you may want to scale graphics so they all look the same. However, if you happen to have images of different width, height or aspect ratio, you're in for some tricky math. Luckily for you, LyX lets you set the image width in column and page width percentage, which makes the work so much simpler.

And the code for this is, using 100% Column Width as the example:
\begin{figure}[H]
\caption{image title}
\includegraphics[width=1\columnwidth]{image-file-path}
\end{figure}
\caption{image title}
\includegraphics[width=1\columnwidth]{image-file-path}
\end{figure}
The caption is optional, of course.
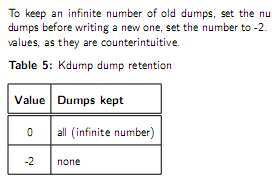
Trick 5: Table cell padding/spacing
If you feel that default cell padding in LaTeX is a bit spartan and ugly, you're right. The solution is to stretch the table so there's more space around items, making it looks less crowded and easier to read.
For example, to double the cell spacing:
\renewcommand{\arraystretch}{2}
End result:
Trick 6: Make a non-standard page
What if you want to omit one of your pages from using the default styling? What if you need special formatting, extra indentation, new colors, whatever? To this end, you will be using the thispagestyle command.
For example, to make the page use no style:
\thispagestyle{empty}
This could be quite useful for front pages, where you don't want headers, footers or numbering. On the other hand, the command below will specifically place the headings onto the page, based on your definition in the Preamble.
\thispagestyle{headings}
Trick 7: Nice captions
Do you want your captions to be fancy, with bold declaration and nice wrapping, similar to what we did with our footnotes? Sure do. The default figure float captions are somewhat boring, but you can easily pimpify them with a bit of code:
\usepackage{caption}
\captionsetup{labelfont=bf,format=plain,indention=0cm,
justification=raggedright,singlelinecheck=false}
\captionsetup{labelfont=bf,format=plain,indention=0cm,
justification=raggedright,singlelinecheck=false}
This goes into the Preamble:
You will need the caption package to be able to use these settings.
Trick 8: Insert programming language code with syntax highlighting
This is real hardcore, but you will like it. Rather than manually trying to create blocks of text that look like programming language code, you can use the listings package to get excellent and immediate results.
listings offers syntax highlighting for a wide range of languages, text wrapping, line numbering, and other cool things. It is impossible to explain every little detail, but here's a real-life case:
\lstset{tabsize=2,breaklines=true,numbers=left,basicstyle=footnotesize,xleftmargin=30pt}
\lstinputlisting[language=C,]{null-pointer.c}
\lstinputlisting[language=C,]{null-pointer.c}
We will read a file called null-pointer.c, which we identify as C language. The default tab size will be two spaces. We will break lines for long pieces of code. Numbers go to the left, 30 points from the page margin, styled in footnote size. Simple, isn't it?
A humble example:

Final result:

Trick 9: Watermarks
How about transparent image logos and fancy watermarks? No problem. This can also be done with ease and flair. First, you need to use the watermark package and declare it in the document Preamble.
\usepackage{watermark}
Next, you need to place the watermark where you desire. You can also use the \put command to specify the exact location of the image. For best effect, it should be a low-contrast, transparent image.
For instance:
\thiswatermark{\centering \put(0,-660){\includegraphics[width=
\textwidth]{tux.png}} }
\textwidth]{tux.png}} }
This command tells us to place a watermark based on the tux.png file, on a single page, with vertical offset of 660pt, centered to text width. You can go wild with vertical and horizontal positioning, scaling and whatnot. You can also use the same watermark on all pages, if you like. My example is not that beautiful, but it demonstrates the concept:

You can also use the draftcopy package for DVI and PS output or pdfdraftcopy for PDF output to place a diagonal DRAFT on your pages. For example:
\usepackage{draftcopy}

Trick 10: Horizontal and vertical spaces
Normally, you ought not make any styling changes to your pages. LaTeX will smartly parcel your paragraphs and images across pages, trying to achieve the best fit and clarity at the same time, including slightly increasing and decreasing line spacing or shifting entire blocks of text.
Still, if you must, you can use \vspace{} and \hspace{} commands to create artificial gaps in your text flow. Of course, you should always check against the final output to make sure it looks as you expect. Exempli gratia:
\vspace{1cm}
Vertical spacing can be useful if you're using multiple columns and want different columns to have a ragged bottom. Combined with \raggedbottom and clear page, vspace can make your elements align with greatest compactness, especially if you have images or tables that break the flow.
Trick 11: Articles with multiple columns
Speaking of multiple columns, you can create article with two, three or more columns quite easily. Just use the multicol package. Declare it in the Preamble and then anywhere in your body, switch between single and multiple columns as you see fit:
\begin{multicols}{}
content goes here as usual ...
\end{multicols}
content goes here as usual ...
\end{multicols}
You can alternate between single and multiple columns. For example, you may want to span your images and tables across the page, but use two blocks of text. Just remember that text will span left to right within the block and won't break over into the second multi-column section further below.
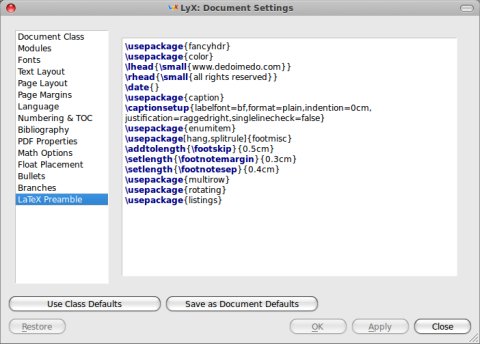
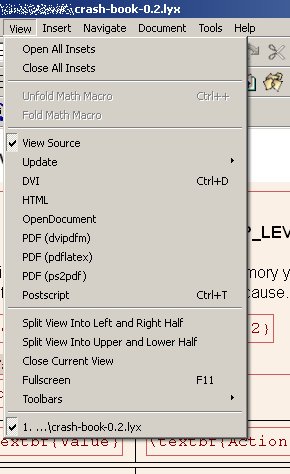
Best tip of all: take a look at the source
LyX code is still just text. It's LaTeX, with a few special tags. You can always open the file in a text editor and examine the special declarations you just did using the GUI. So if you're wondering what hides behind float elements, tables and other cool formatting, just take a look at the source. Pretty much like examining an HTML file.

Here's a Linux example:


Conclusion
There you go. This article is a thermonuclear geek device, but I think it's useful. While my personal experience may not be of any use to you, especially if you've never tried LaTeX before, I hope this article can intrigue you and prompt you into trying.
The important lessons we've learned today are: LaTeX can be pimped into any style you want, sometimes with more freedom and elegance than a typical office suite program. LaTeX is a vast and rich world, with a package for pretty much anything. You can probably clone baby koalas using the right package; it's unto text what repository is unto Linux. Lastly, you gained simple and quick answers to some common issues that may arise during your LaTeX escapades.
If you have other cases you consider useful and worthy of covering, or maybe questions that still lay around unanswered, then feel free to mail me, and there might yet be a sequel to this article.
Ahora unos videotutoriales sobre LyX
Ahora unos videotutoriales sobre LyX
http://www.lyx.org/WebEs.Screenshots
http://www.lyx.org/WebEs.Features
http://bioinformatiquillo.wordpress.com/manual-latex-con-lyx/
http://www.qfa.uam.es/informatica/LyX/lyx/index.html